G-A1 | 支援ArduPilot & PX4
G-A1是一款依據Pixhawk Autopilot v6X標準所開發的通用控制器(飛行控制器),搭載STM32H753雙精度浮點FMU主處理器,以及STM32F103 IO處理器。 G-A1配置了獨立匯流排與電源供應插槽,並整合多組IMU,所搭配的六軸慣性感測器、壓力/溫度感測器與地磁感測器,可提升安全性並具備極佳的擴展能力。G-A1內建10/100M乙太網路實體層(PHY),可與任務電腦(機載電腦)、高階測繪攝影機及其他掛載的設備進行高速通訊,以滿足先進UxV系統的需求。

產品介紹
硬體規格
| 項目 | 說明 |
|---|---|
| FMU處理器 | STM32H753 (Arm® Cortex®-M7, 480MHz) |
| IO處理器 | STM32F103 (Arm® Cortex®-M3, 72MHz) |
| 記憶體 | 2M快閃記憶體及1M RAM |
| 感測器 |
|
| IO介面 |
|
| MicroSD卡 | 不包含於配件中。 |
| 電源需求 | 4.6V ~ 5.7V |
| 額定電流 |
|
| 操作溫度 | -40°C ~ +55 °C |
| 儲存溫度 | -40°C ~ +70 °C |
| 操作濕度 | 5% ~ 95% (無冷凝) |
| 外殼材質 | ABS (底板),鋁壓鑄 (IMU上蓋) |
| 尺寸 | 92.2 (長) x 51.2 (寬) x 28.3 (高) mm |
| 重量 | 77.6 g |
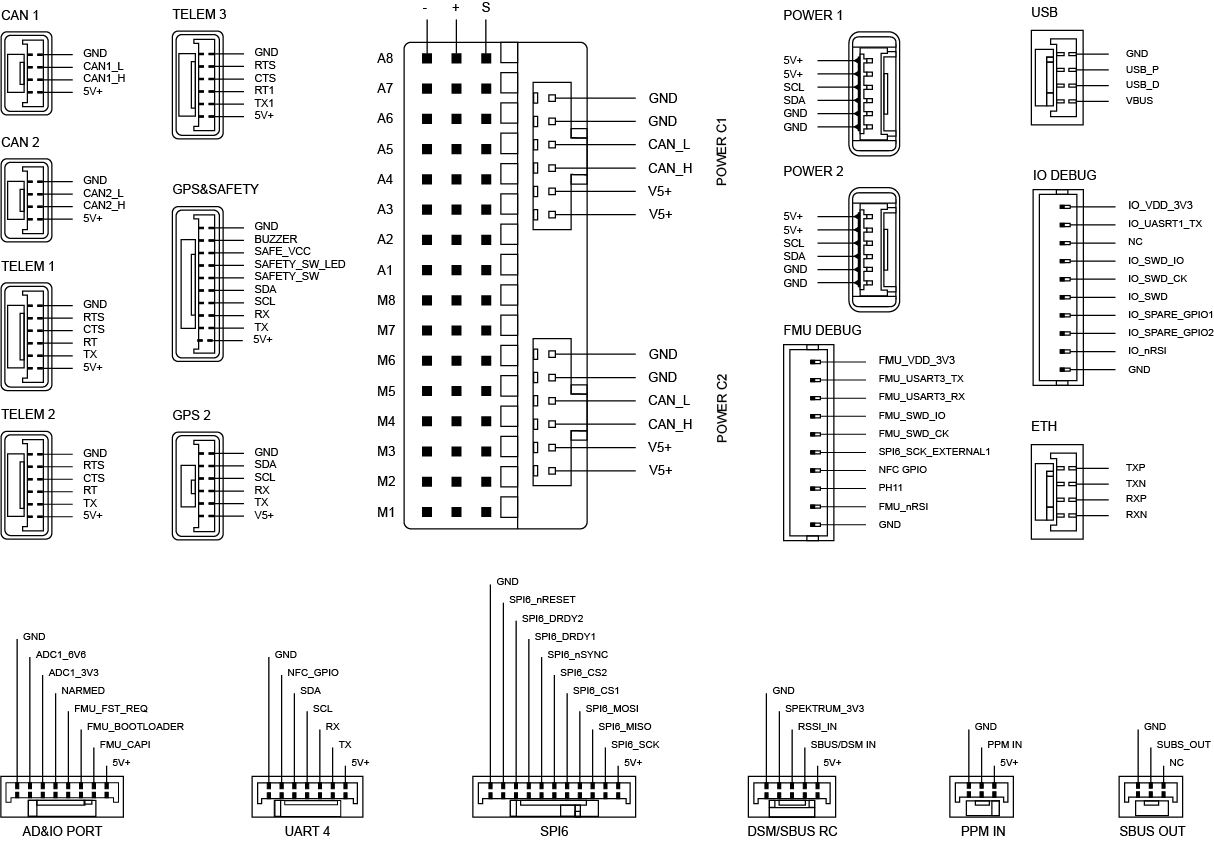
針腳定義

接線
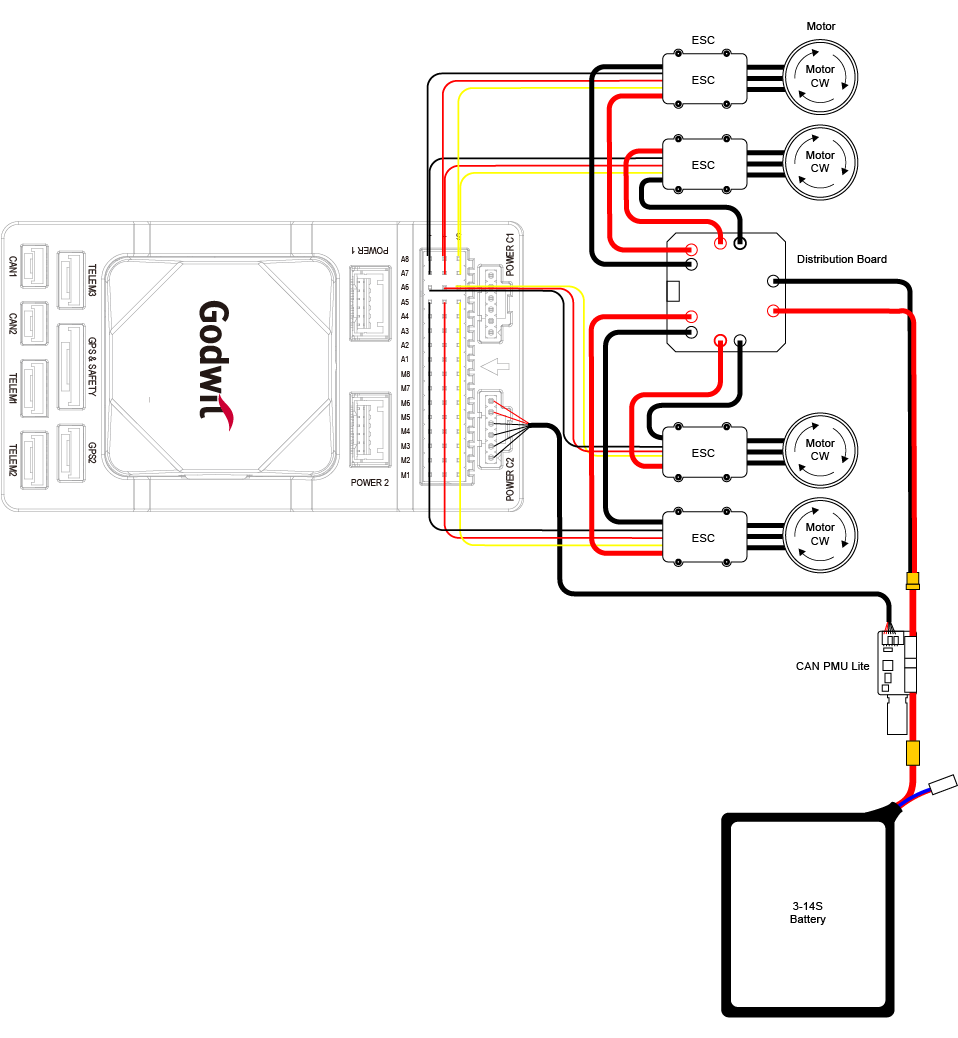
下圖為G-A1及其週邊設備的連接參考圖。

| 介面 | 功能 |
|---|---|
| POWER C1 | 將CAN PMU連接至POWER C1,該埠用於連接UAVCAN電源模組。 |
| POWER C2 | 將CAN PMU連接至POWER C2,該埠用於連接UAVCAN電源模組。 |
| POWER 1 | 連接至SMbus (I2C)電源模組。 |
| POWER 2 | 連接至SMbus (I2C)電源模組。 |
| GPS&SAFETY | 連接至GPS模組 (含GPS、安全開關與蜂鳴器介面)。 |
| GPS2 | 連接GPS/RTK模組。 |
| UART 4 | 用戶自定義用途。 |
| TELEM1/TELEM2/TELEM3 | 連接遙測(telemetry)或MAVLink裝置。 |
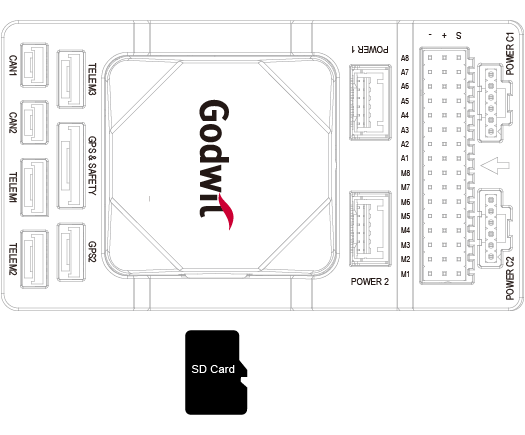
| MicroSD | 插入MicroSD卡以儲存日誌。 |
| A1-A8 | 可定義為PWM/GPIO,支援Bdshot,用於相機快門、舵機等。 |
| M1-M8 | 從IO輸出PWM,連接至ESC (electronic speed control)與舵機。 |
| USB | 連接G-A1至電腦進行通訊,如下載韌體。 |
| CAN1/CAN2 | 連接至Dronecan/UAVCAN裝置。 |
| DSM/SBUS/RSSI | 此為DSM/SBUS/RSSI訊號輸入介面,可用於連接DSM衛星接收器、SBUS遙控接收器,或RSSI訊號強度回傳模組。 |
| PPM | 連接至PPM RC接收器。 |
| ETH | 連接至Ethernet裝置。 |
| AD&IO | 連接類比輸入(ADC3.3 or ADC6.6)介面。通常不會使用。 |
| FMU Debug | 供專業人員及開發者使用。 |
| IO Debug | 供專業人員及開發者使用。 |
序列埠對應
| UART | 裝置 | 連接埠 |
|---|---|---|
| USART1 | /dev/ttyS0 | GPS |
| USART2 | /dev/ttyS1 | TELEM3 |
| USART3 | /dev/ttyS2 | Debug Console |
| UART4 | /dev/ttyS3 | UART4 |
| UART5 | /dev/ttyS4 | TELEM2 |
| USART6 | /dev/ttyS5 | PX4IO/RC |
| UART7 | /dev/ttyS6 | TELEM1 |
| UART8 | /dev/ttyS7 | GPS2 |
功耗
電壓
| 參數 | 最小值 | 標準值 | 最大值 |
|---|---|---|---|
| 4.6V | 5V | 5.4V |
電流
| 參數 | 標準值 | 最大值 |
|---|---|---|
| G-A1及組件 | 3.0Amp | 3.44Amp |
| 僅G-A1 | 0.44Amp | 0.58Amp |
快速安裝
本快速指南將說明如何為G-A1供電,並連接其週邊設備。請參考以下說明,正確連接感測器與週邊模組。
其他操作介紹,請參考以下連結之說明:
機體方向

注意:
如果無法將G-A1安裝在建議的預設方向(例如受到空間限制),請在自動駕駛軟體(autopilot software)中設定實際使用的安裝方向。
韌體支援
G-A1支援PX4以及Ardupilot,韌體支援可參照以下連結:
- Ardupilot Source Code
- Ardupilot Stable Release Ver. 4.6.3 Image File
- PX4 Source Code
本產品包含開源軟體,請閱讀《開源授權與商標》。
GPS
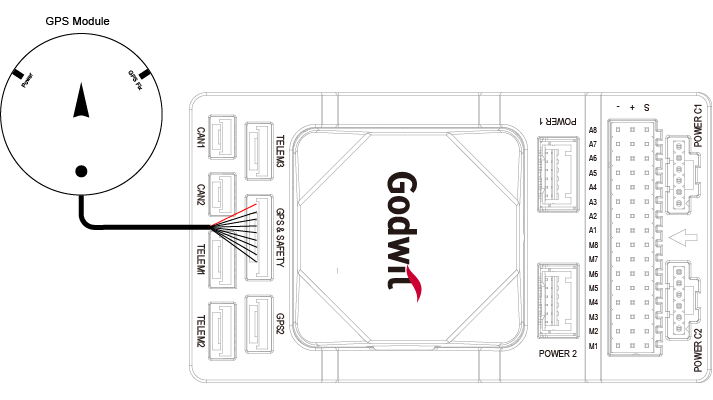
建議使用CAN/UAVCAN GPS/RTK,只需將其連接到CAN 1/2介面即可。或者使用一般的GPS/RTK模組,並將其連接至GPS介面。GPS模組通常整合了GPS、指南針、安全開關、蜂鳴器和LED狀態指示燈。安裝模組時,應將其安裝在支架上,遠離其他電子設備,並朝向底板的前方。

無線電遙控(Radio Control)
連接手持遙控器,即可監控和控制飛行中的無人機。
無線電系統的機上端(airborne end)應連接至TELEM1/TELEM2/TELEM3介面,DSM/SBUS接收器則連接至DSM/SBUS介面,PPM接收器則連接至PPM介面。其他協議的詳細說明,請參看Ardupilot無線電控制系統(Radio Control System)文件。

電源
G-A1的CAN PMU模組可支援3-14S鋰電池組。本包裝不包含PMU,請自行準備符合CAN PMU模組規格的PMU。為確保連接正確,請將模組的6針接頭連接到G-A1的Power C1和Power C2介面。
在執行Autopilot時,控制器即是一個隨插即用的設備,無需多加設定。

MicroSD卡
包裝中不包含MicroSD卡,請另行準備,並將其插入插槽。

馬達/舵機
馬達與舵機應依照所使用的飛行器之機身參考手冊中所列的順序,分別連接至A1–A8或M1–M8腳位。

舵機電源
G-A1本身不提供舵機電源。若需為舵機供電,必須透過外接的穩壓模組(BEC, Battery Eliminator Circuit),並將其正極與負極分別連接至A1–A8或M1–M8連接埠中的任一組腳位。
參考連結
以下連結,可為你在組裝或操作G-A1時提供更多有用的資訊。
Ardupilot
- Information for the First Flight First Time Setup
- Godwit G-A1 Accton Godwit G-A1 on Ardupilot
PX4
- Introduction for Novic Users Using PX4 Basic Concepts
- Assembling a UAS Assembling a Multicopter
- Godwit G-A1 Accton Godwit G-A1 on PX4
- Pixhawk Standard Pixhawk Standard Autopilots|PX4 Gu