PMU
Analog PMU
Accessories to be Prepared in Advance
- Godwit GA-1 Universal Controller (with Ardupilot or PX4 software installed)
- Analog Power Module (e.g. Holybro's PM02, PM06 v2 or Cupepilot's Power Brick Mini)
- Power (Type 2) Analog Cable (included in the accessory kit)
- Laptop (with Mission Planner or QGroundControle installed)
- USB Type-C Cable (for connecting the G-A1 to the laptop)
Connection
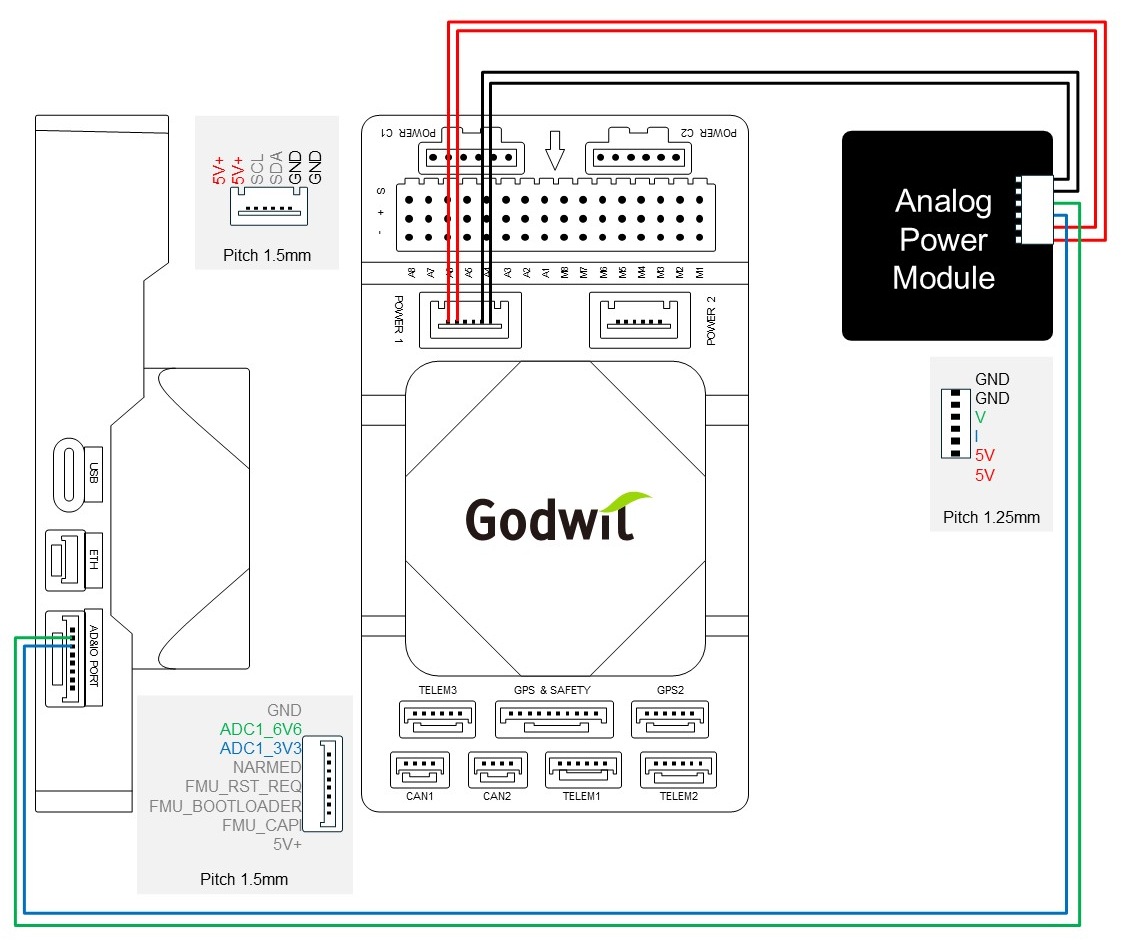
Please refer to the diagram below and connect the G-A1 to the analog power module. Ensure that the pin definitions of the analog module match those shown in the diagram.
Ardupilot - Mission Planner Configuration
- Open Mission Planner on your laptop.
- Connect the G-A1 to Mission Planner via a USB Type-C cable.
- After Mission Planner receives data, open Config > Full Parameter List.
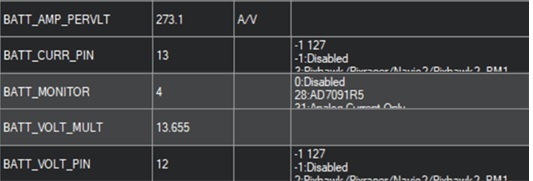
- Set “BATT_MONITOR” to 4, then reboot the G-A1 for the change to take effect. (Use Ctrl+F to find Reboot Pixhawk, or replug the USB cable with the battery disconnected.)
- Set the values as following:
- BATT_VOLT_PIN: 12
- BATT_CURR_PIN: 13
- Configure the BATT_VOLT_MULT parameter according to your PMU specifications
- Configure the BATT_AMP_PERVLT parameter according to your PMU specifications
- Configure the BATT_CAPACITY parameter according to your battery capacity rating, if needed.
The parameters BATT_AMP_PERVLT and BATT_VOLT_MULT are configured based on the analog power module’s Voltage Divider and Amperes-per specifications, respectively. They can be identified by referring to the specifications of the power module in use. Examples are shown below:
| Type | BATT_VOLT_MULT | BATT_AMP_RERVLT | Ref. Source |
|---|---|---|---|
| Holybro PM02/PM06 | 18.182 | 36.364 | Holybro's Product Specification |
| CubePilot Power Brick Mini (Product Code: HX4-06008) |
13.655 | 273.1 | CubePilot's Product Test Data |
- Check if BAT VOLTAGE is shown.
Tip:
To add Bat Voltage to the Quick page, you can:
- Go to Data > Quick page.
- Double-click any existing data title/item you want to replace.
- Check (enable) battery_voltage on the Display This page.

PX4 - QGroundControl Configuration
- Connect the G-A1 to your laptop via a USB Type-C cable.
- Open QGroundControl, and go to Vehicle Setup > Parameters page.
- Set the parameters as following:
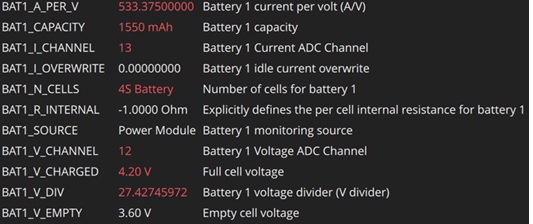
- BAT1_SOURCE: Power Module
- BAT1_V_CHANNEL: 12
- BAT1_I_CHANNEL: 13
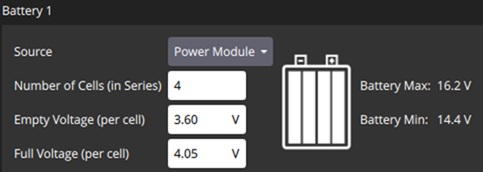
- BAT1_V_CHARGED: 4.2V (according to the maximum voltage of your battery)
- Configure the BAT1_V_DIV parameter according to your PMU specifications
- Configure the BAT1_A_PER_V parameter according to your PMU specifications
- Configure the BAT1_CAPACITY parameter according to your battery capacity rating, if needed.
- After configuring the parameters above, you need to reboot the G-A1.
- Check if the battery icon is shown on the home page’s top bar.
Examples are shown below:
| Type | BATT_VOLT_MULT | BATT_AMP_RERVLT | Ref. Source |
|---|---|---|---|
| Holybro PM02/PM06 | 18.182 | 36.364 | Holybro's Product Specification |
| CubePilot Power Brick Mini (Product Code: HX4-06008) |
27.427 | 533.375 | CubePilot's Product Test Data |

I2C PMU
Accessories to be Prepared in Advance
- Godwit GA-1 Universal Controller (with Ardupilot or PX4 software installed)
- I2C Power Module (e.g. Holybro's PM02D 6S)
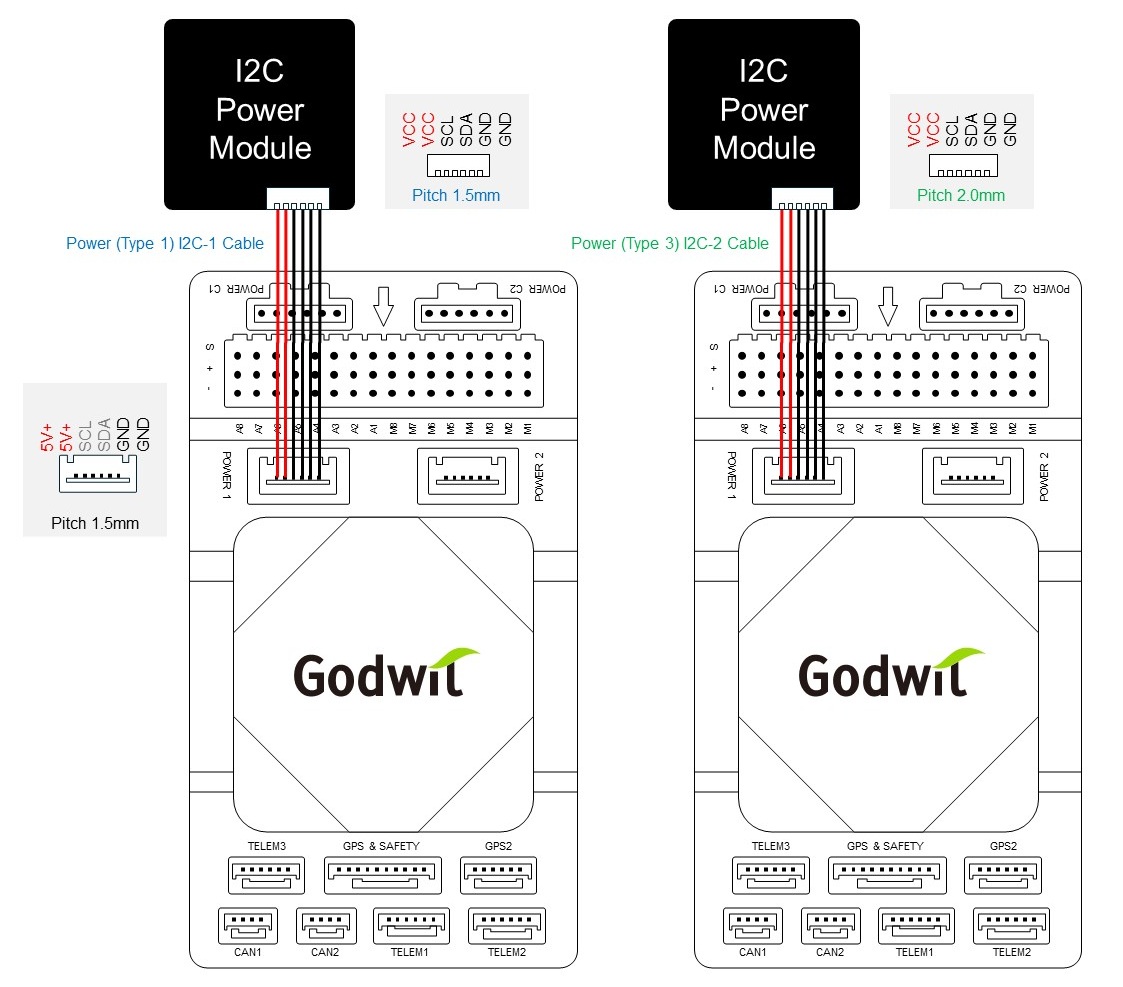
- Power (Type 1) I2C-1 Cable or Power (Type 3) I2C-2 Cable (depending on your module's pin pitch; included in the accessory kit)
- Laptop (with Mission Planner or QGroundControle installed)
- USB Type-C Cable (for connecting the G-A1 to the laptop)
Connection
Please refer to the diagram below and connect the G-A1 to the digital power module. Ensure that the pin definitions of the digital module match those shown in the diagram.
Ardupilot - Mission Planner Configuration
- Open Mission Planner on you laptop.
- Connect the G-A1 to Mission Planner via a USB Type-C cable.
- After Mission Planner receives data, open Config > Full Parameter List.
- Set BATT_MONITOR to 21 when using the Holybro's PM02D 6S or set the parameter according to your PMU specifications. Then reboot the G-A1 for the change to take effect. (Use Ctrl+F to find Reboot Pixhawk, or replug the USB cable with the battery disconnected.)
- Set the BATT_CAPACITY parameter according to your battery capacity rating, if needed.
- Check if BAT VOLTAGE is shown.
Tip:
To add Bat Voltage to the Quick page, you can:
- Go to Data > Quick page.
- Double-click any existing data title/item you want to replace.
- Check (enable) battery_voltage on the Display This page.
PX4 - QGroundControl Configuration
- Connect the G-A1 to your laptop via a USB Type-C cable.
- Open QGroundControl, and go to Vehicle Setup > Parameters page.
- Set the values as following:
- BAT1_SOURCE: Power Module
- SENS_EN_INA226: Enabled
- Configure other parameters in Power according to your battery capacity rating, if needed.
- After configuring the parameters above, you need to reboot the G-A1.
- Check if the battery icon is shown on the home page’s top bar.
DroneCAN PMU
Accessories to be Prepared in Advance
- Godwit GA-1 Universal Controller (with Ardupilot or PX4 software installed)
- DroneCAN Power Module
- PowerC Cable (included in the accessory kit)
- Laptop (with Mission Planner or QGroundControle installed)
- USB Type-C Cable (for connecting the G-A1 to the laptop)
Connection
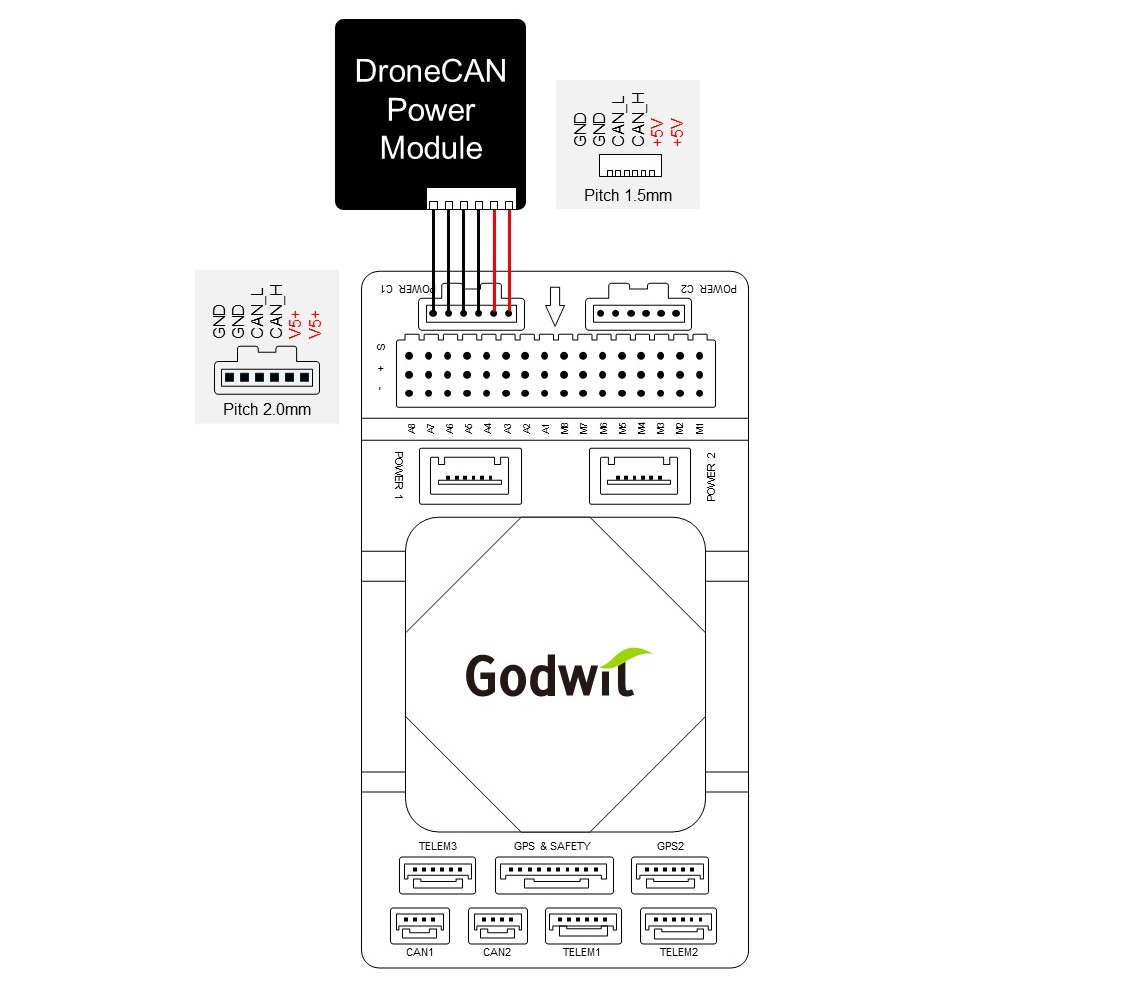
Please refer to the diagram below and connect the G-A1 to the digital power module. Ensure that the pin definitions of the digital module match those shown in the diagram.
Ardupilot - Mission Planner Configuration
- Open Mission Planner on you laptop.
- Connect the G-A1 to Mission Planner via a USB Type-C cable.
- After Mission Planner receives data, open Config > Full Parameter List.
- Set BATT_MONITOR to 8 or set the parameter according to your PMU specifications. Then reboot the G-A1 for the change to take effect. (Use Ctrl+F to find Reboot Pixhawk, or replug the USB cable with the battery disconnected.)
- Set the BATT_CAPACITY parameter according to your battery capacity rating, if needed.
- Check if BAT VOLTAGE is shown.
Tip:
To add Bat Voltage to the Quick page, you can:
- Go to Data > Quick page.
- Double-click any existing data title/item you want to replace.
- Check (enable) battery_voltage on the Display This page.
PX4 - QGroundControl Configuration
- Connect the G-A1 to your laptop via a USB Type-C cable.
- Open QGroundControl, and go to Vehicle Setup > Parameters page.
- Set the values as following:
- BAT1_SOURCE: Disabled
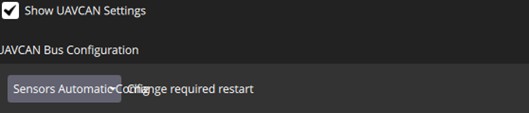
- UAVCAN_ENABLE: Sensors Automatic Configure or Sensors and Actuator (ESCs) Automatic Configure, if needed.
- UAVCAN_SUB_BAT: Raw data
- After configuring the parameters above, you need to reboot the G-A1.
- You can also configure UAVCAN_ENABLE on the Power page. First, enable Show UAVCAN Settings. After configuration, you may still need to go to the Parameter page and set UAVCAN_SUB_BAT to Raw data.
- Check if the battery icon is shown on the home page’s top bar.

Firmware Upgrade
Please refer to the steps to load your G-A1's firmware with Mission Planner.
Mission Planner
- Download the appropriate G-A1's firmware from the ArduPilot or PX4-Autopilot website according to your vehicle type, such as:
- Download and install Mission Planner from the ArduPilot website.
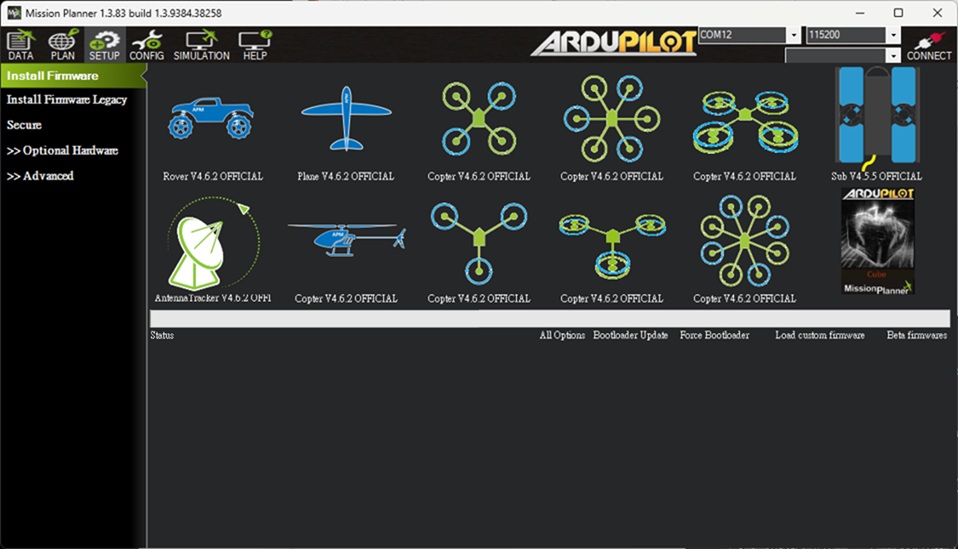
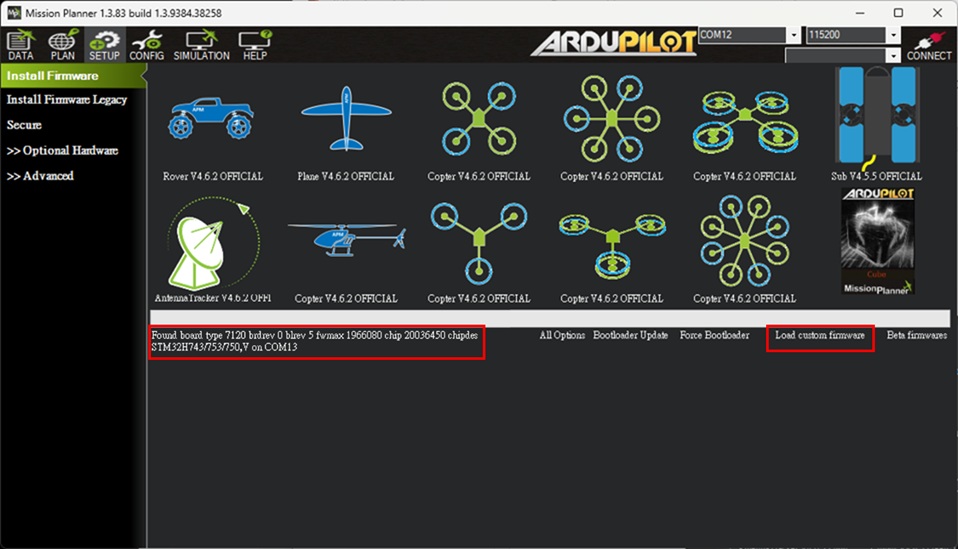
- Open Mission Planner, and go to SETUP > Install Firmware page.
- Connect the G-A1 to the laptop or PC using a USB Type-C cable. When the board information appears, click Load custom firmware to upload the G-A1 firmware file.
- The firmware upgrade process takes less than one minute. Switch to the DATA page after finishing upgrade process.
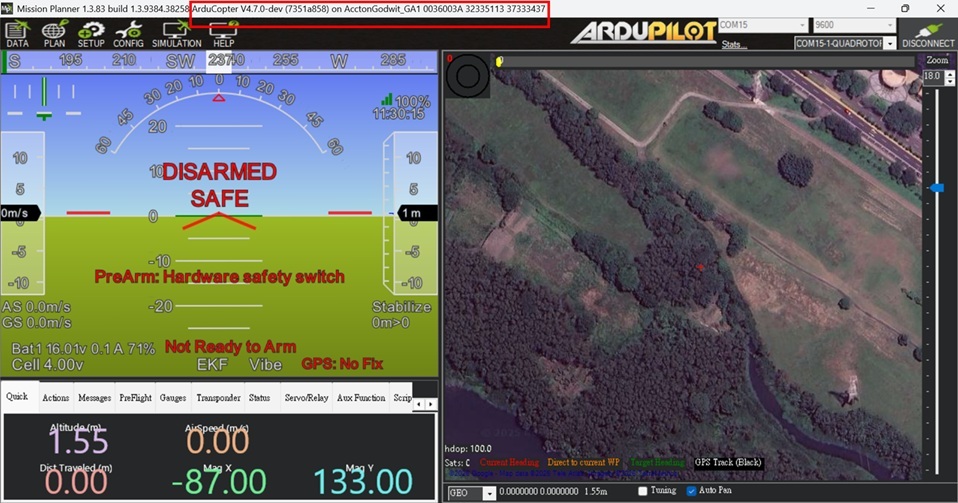
- Reboot the G-A1 and wait until the LED flashes green steadily . Select AUTO from the COM port list to connect to the G-A1 via MAVLink.
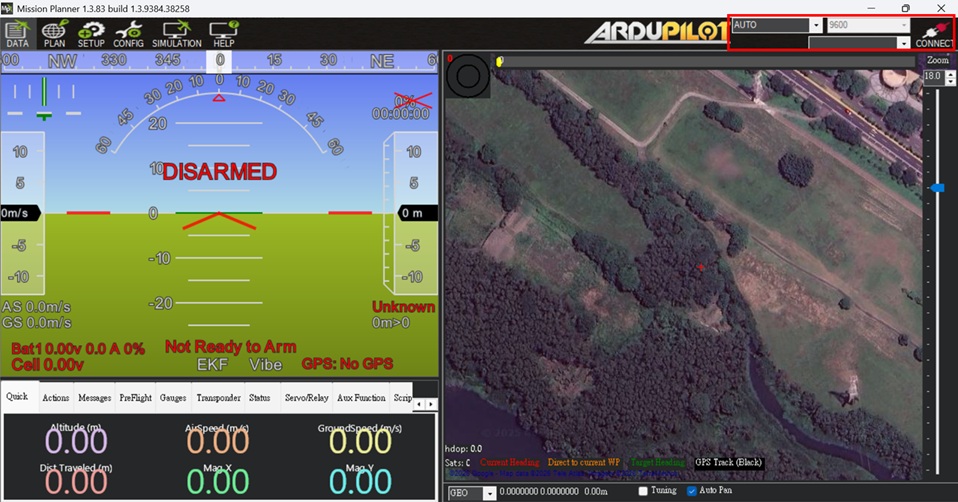
- While the MAVLink connection is active, Mission Planner will display the G-A1 firmware version.
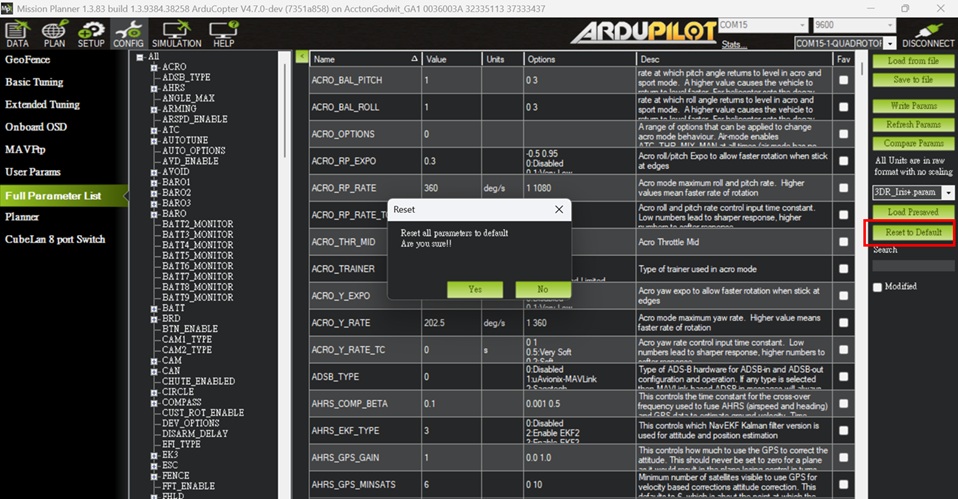
- It is recommended to execute the G-A1 Reset to Default function from CONFIG > Full Parameter List before setting up the initial G-A1 configuration.